

NEW! I just launched my FREE Blogging course!! You can sign up for it right here!
You would love to get started with a blog to make some money for school or college but don’t know where and how to start? I was in the same place.
I wanted to start a blog but didn’t have much to invest. But I’ve done it, and you can too! In today’s post, I’m gonna show you how to start a profitable blog as a student, on a budget!
BTW: I am sharing my Blog income reports every month with my EMAIL SUBSCRIBERS, so if you’re interested in those, make sure to sign up! You’ll also receive the password for my freebie library, so double win! You can sign up through any of my forms on the sidebar or footer.
I know that the thought of having an already set up blog with lots of posts and traffic sounds perfect to you, but you will need to put the effort and time into it to get there. But you will! I believe in you.
After reading this post (stick with me!) you will know what steps you need to take to get your blog up and running the professional way!
Disclaimer: This post may contain affiliate links. If you purchase via my link I get a small commission at no additional cost to you. I only recommend things I use and love! That helps support this blog and makes it possible to provide free content for you! Thank you. Read my full disclosure here.
NOTE: IF YOU ALREADY HAVE YOUR NICHE AND NAME FIGURED OUT, YOU CAN SKIP TO “Finding a Host” FOR THE SETUP GUIDE.
The first thing you want to spend some time on is your PURPOSE. You NEED to know what you want to share with the world in order to succeed with your blog.
Blogging about every topic and just your life may work for celebrities, but not for normal people. Think about what makes you happy and what you’re good in.

When you found your niche (your topic), you can start thinking about what kind of content you want to create.
Is it maybe travel guides? How to start a profitable blog (when you have achieved it obviously) or your expertise in painting? It can be anything, but you need to have at least an idea.
If your Blog description says “all about making money”, you shouldn’t post about the best chicken recipes. Otherwise, people are going to be confused and are not going to follow you!
That’s important to keep in mind if you really mean blogging as a business.
1. YOUR MISSION STATEMENT
The next thing you will want to do is to think of a so-called “mission statement”.
A mission statement puts the topics of your choice into a sentence, a statement. That is helpful when you will be creating your branding and content for your blog and social media.
Before posting, you will ask yourself “Is this picture/message representing my statement? Is it cohesive?”
2. FIND A NAME
1. Try to find something that isn’t taken in any form. Now, I know that is hard, but you don’t want people landing on another website when you tell them your blog name!
2. I would recommend choosing a .com domain ending because it looks most professional to me. But you can also choose .org, .blog, and so on.
3. What I recommend for finding your name, is to make a sheet with all the keywords that come to your mind related to your niche and mission statement, and trying to combine them. Here is an example of my sheet:

I know, it is INCREDIBLY messy, but it doesn’t have to be all neat! It’s only for the purpose of you getting a feel of what kind of a name you would like to have.
4. Whenever I came up with a combo, I checked online if the website was taken. Many times it was.
You can do that by just inserting into the URL line of your search engine or you google “domain checker”, and check it with any of the listed websites.
You can use this one from Bluehost:
By loading the tweet, you agree to Twitter's privacy policy.
Learn more
3. INSTALLING WORDPRESS
After finding your niche, mission, and name, you can move on with installing wordpress.org (don’t confuse it with wordpress.com!)
WordPress.org is where you need to be to customize your blog fully, upload your own theme, and be able to install plug-ins to improve your blog in various areas.
WordPress.com on the other hand is a provider like Jimdo or Wix and is great too, but you usually have to pay a lot more for the good plans monthly to get the same customization options than with being self-hosted.
What does self hosted mean?
WordPress will be the site where you will customize your blog, write content, and so on.
But you will need a host, which will take care of your blog by providing a space for it to be, and making it visible to the public so people can find you online.
Your host is also the place to improve your site’s loading time and security.
4. PICKING A HOST
I personally use Hostpoint, which is a Swiss host (I am Swiss by the way).
The reason why my blog is under their hosting is simply that my parents have several companies themselves, and they’re all hosted there, so it was just easier (and cheaper) for me to just add my blog to their account.
What I can recommend you though, is Bluehost. Bluehost is an international hosting company, and is super affordable! You can start a blog for as little as $3.95 per month.
They will store your blog on their server so it is not depending on website creators like wix.com or wordpress.com, which have control over how much money you can make with your site.
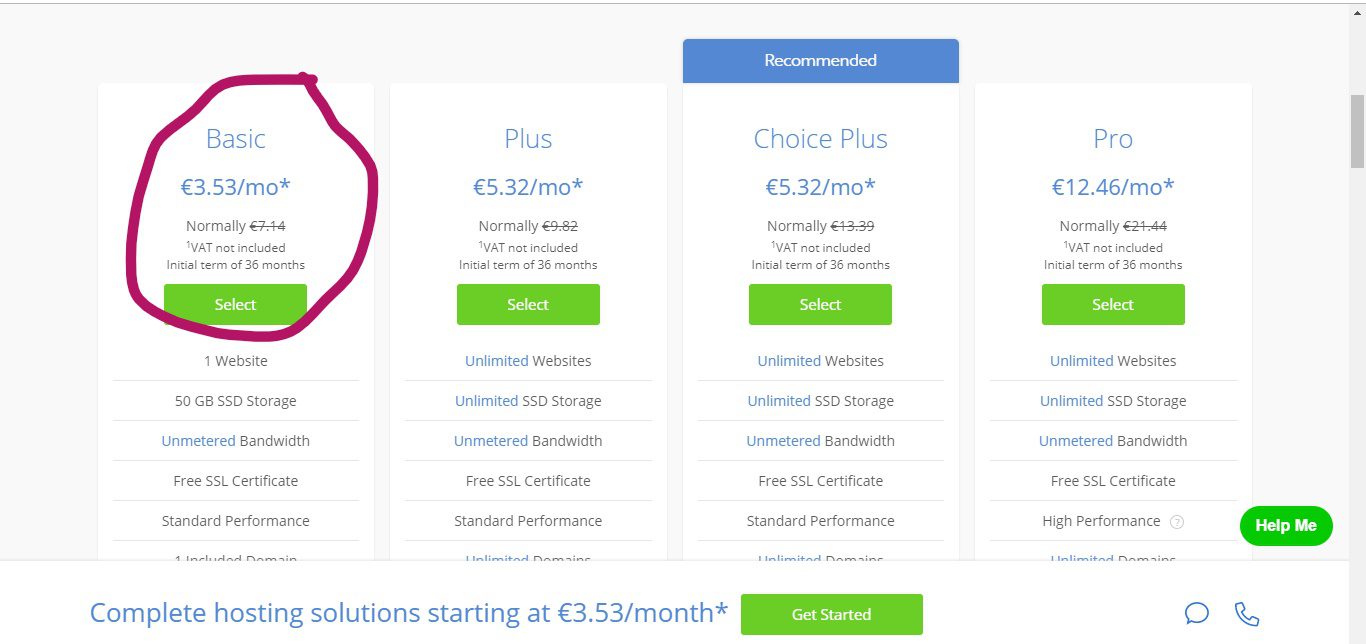
Here is how the sign-up process looks like:
After picking your plan, you will be forwarded to fill out your information. You can first choose if you have a domain or if you don’t.
If you want to get a domain through Bluehost, it will only cost you an extra $0.88 per month!
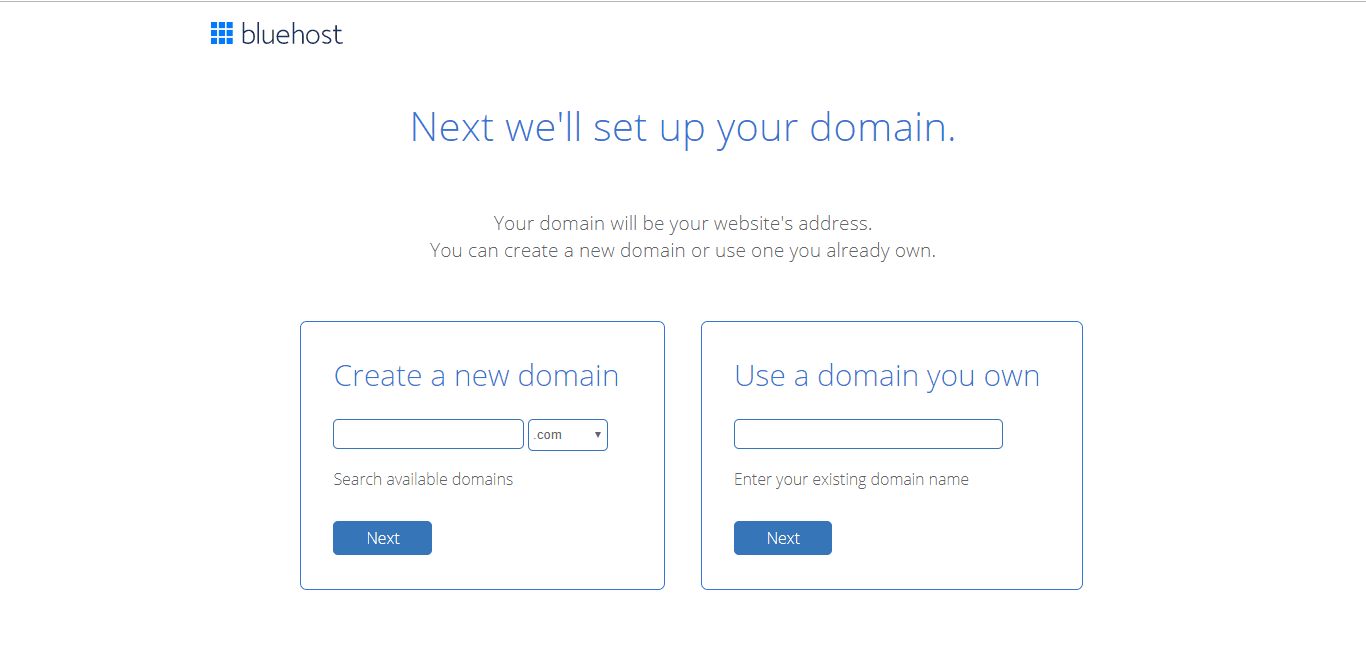
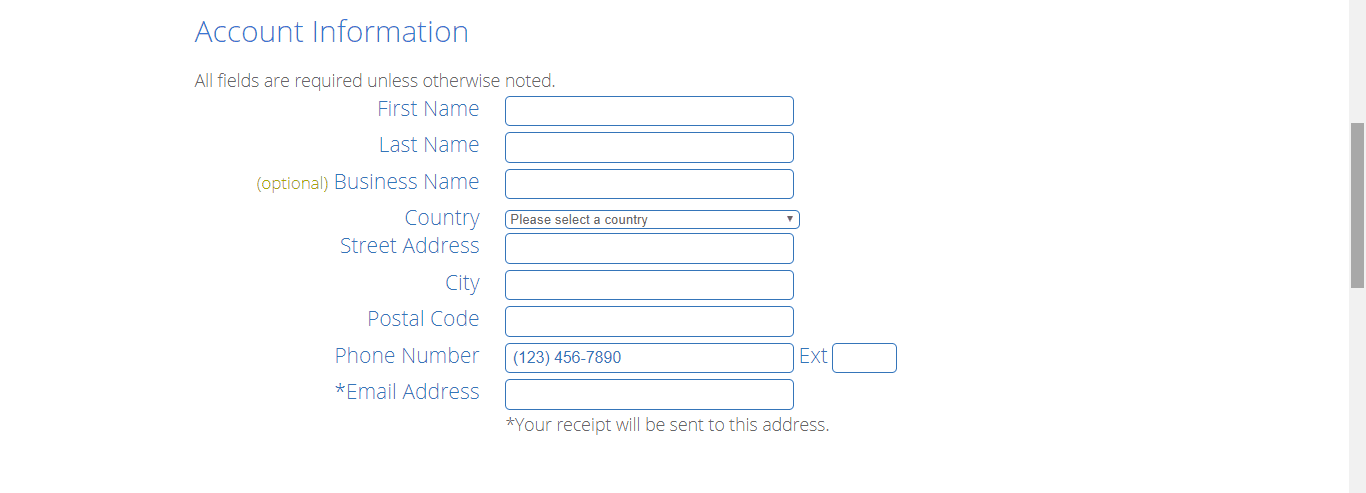
In this screenshot, you can see how it lets you choose your country! I love international providers. It’s such a lifesaver.

This is the plan you will pick. You can see how it’s the price for 3 years.
You can select a shorter period too, but then it’s gonna cost a little more. It’s all about preferences and whether you are committed to your new business!

Click here to start your blog for less than $4 per month!
Next, you can select some extras to go with your hosting plan.
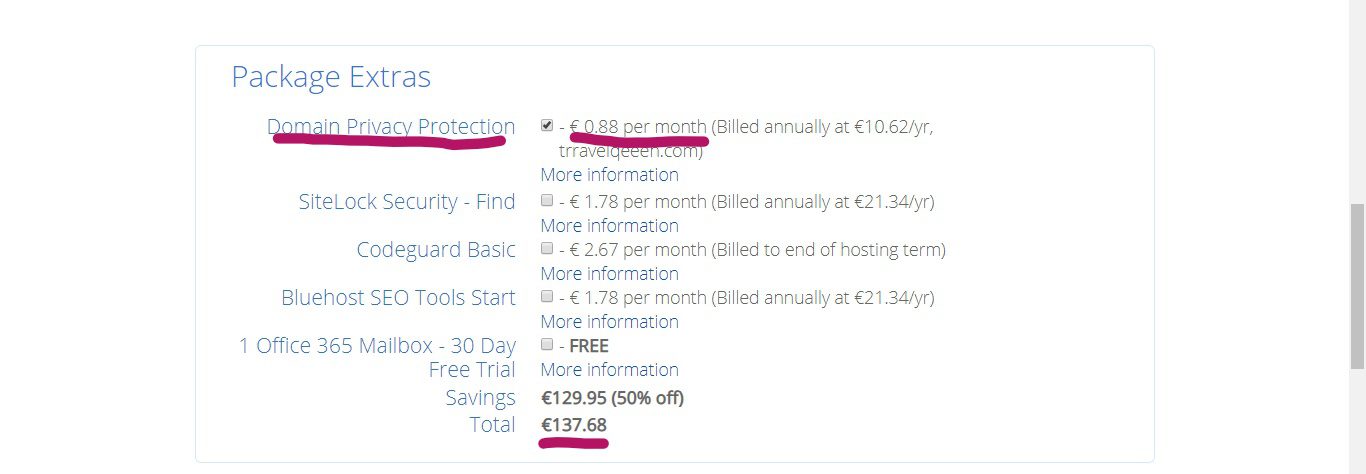
I recommend you adding privacy protection because if not, everyone can access your information!
I would also suggest you add the security option since that’s what’s going to make your site secure to visit. (meaning https instead of http and a red security warning)
You can add those features at any time though.
Remember, that total on the screenshot is the cost for 3 YEARS! That is amazing! The process is explained step by step, and you can always contact the support if you have any questions.
BONUS: With my link, you can get a FREE domain for the first year, and an SSL certificate is also included. That is very important for your blog to stay secure and have the little secure sign at the left of your URL. If your site isn’t secure, it may get blocked for others to see!
5. THE BEST THEME FOR YOUR BLOG
After you have successfully installed your host and WordPress, it’s time to think about your design. (my favorite part of blogging!)
You can choose from various WordPress themes for free, to spend even less money on setting up your blog.

No worries! I’ve got your back! You might have heard of themes to buy. And also, that they can get pretty expensive. But they don’t have to be! There are endless options for affordable themes out there.
My favorite resource is Creativemarket.
Creativemarket is a website that sells BEAUTIFUL and AFFORDABLE themes for WordPress! They also have fonts, templates, and stock images for your blog.

I actually use the Isabelle Theme off CreativeMarket, and love it so much.
In this post, I compare 10 affordable themes, including my own with its features, if you want to check that out!
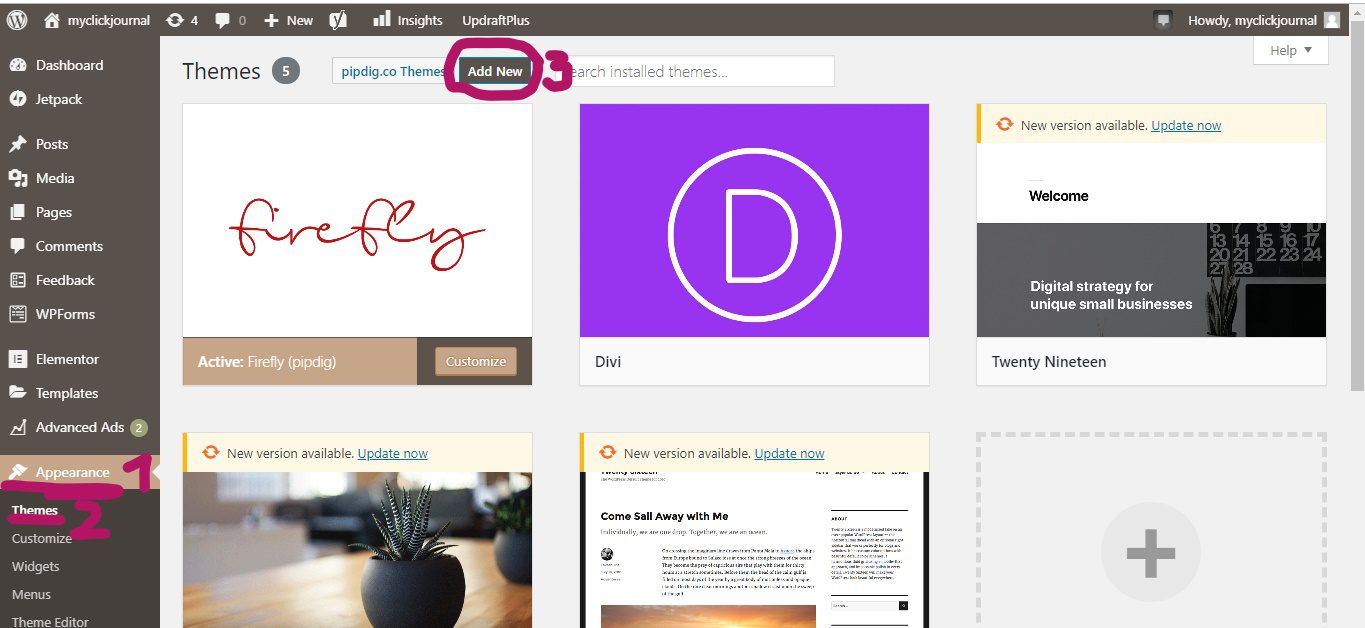
6. HOW TO ADD THE THEME
Purchasing a theme is truly easy. You pay and you get the download! To upload your theme into WordPress, click on Appearance, then themes, and finally on Add New.
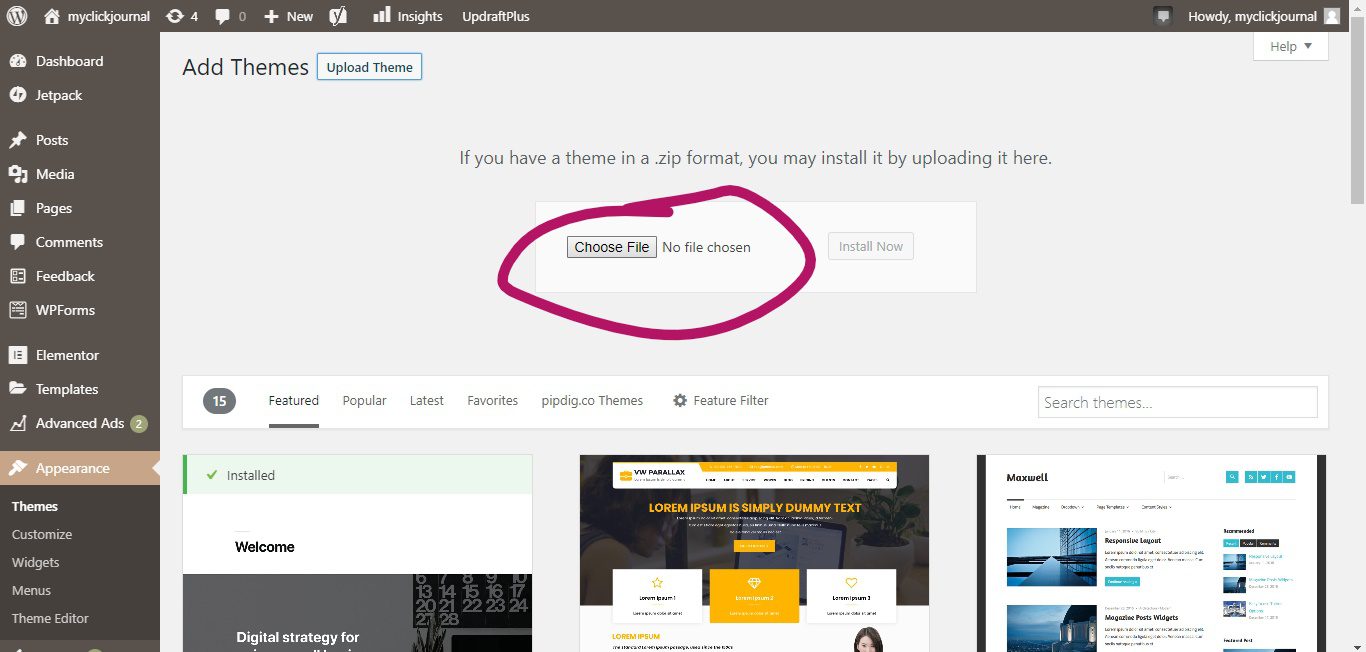
Once uploaded, you can start customizing. I personally love doing that and could spend hours and hours perfecting my design. (not very productive!)
7. GETTING STARTED BLOGGING!
To me personally, this was the hardest part! I had so many ideas, yet no clue how to get started.
And there really is no secret tip in what to do to suddenly have it all published, other than to just GET STARTED.
Sit down, brainstorm your 10-20 next blog posts, and write an outline for the one you want to write first.
I would recommend you to do a regular blog post, even as the first one. You can introduce yourself and your blog in an “About Me” page, which people can access easily when you add it to your menu.
I wrote 2 posts before launching my blog, but I quickly realized that wasn’t enough. Maybe go with 5, if not 10 before you launch, so you have some content to refer to in your posts, and also a place to lead people to so they stay on your website longer (which is part of your goal).
7. SETTING UP AN EMAIL NEWSLETTER
I know what you’re thinking: Emails are for people with page views! But wrong! You should actually start to build your list as soon as possible.

There are several email marketing providers out there. Currently, I’m using Active Campaign to collect and send out emails, but I know that a lot of bloggers use Convertkit.

If you try to do it all on a budget, I would recommend getting started with MailChimp, which is free until 2,000 subscribers. And that’s a lot.
I personally had a few issues with the use of MailChimp, because I wanted to customize more than I could. For just collecting emails in the beginning, it is totally enough though. For real. Don’t stress too much about it.
You can always export your contacts and import them into your upgraded email provider account. (securely though!)
If you want to take blogging more seriously and want to actively build your email list, I can recommend ActiveCampaign, because it’s only $9 per month if you have less than 500 subscribers. You can always increase that subscriber limit by paying a little more.

What I like about ActiveCampaign is that it lets me create unlimited forms, campaigns, and have various lists, which MailChimp wouldn’t let me do with 1 account.
I wanted a separate list for each of my freebies, so the delivery process wouldn’t be all mixed up, which is now possible with ActiveCampaign. It’s super easy to design landing pages and new emails, even automated Email sequences.
8. A WORD ABOUT PINTEREST
You probably know Pinterest. But do you know how it works for bloggers?
Pinterest is an amazing traffic source for bloggers, no matter how many views or followers you have. Pinterest loves new people and new content!
I won’t go into too much detail because that’s content for another post, but setting up a Pinterest account, creating pins for your blog posts, and publishing them to Pinterest is a major part of getting your blog out there.
If you don’t wanna wait for me publishing that Pinterest post, you can check out these resources:
- Pinterest with Ell – I love her course on Pinterest marketing! It is stuffed with valuable information, and is super affordable!
- Complete Pinterest for Beginners Guide – this Blogpost tells you exactly how to set up your Pinterest account to increase blog traffic
- How to Upload Blog Posts to Pinterest – Perfect guide if you have no clue about how to pin your own posts!
9. SETTING UP LEGAL PAGES
You do need to add legal pages to your blog from the beginning because they are required by law and protect you against any lawsuits.
I know hard this one is. Setting up a Privacy Policy, Terms, and Conditions, and a disclaimer isn’t easy!
What I recommend is to first look at other bloggers’ legal pages. That way, you can get an idea of what it should include.
Every blog offers different things and uses different providers (hosts, analytic sites, email…) so it doesn’t make sense to copy legal pages (and it’s also not very legal).
What I have personally used and customized based on what I need protection from, is the Privacy Policy template/course from Blogging for New Bloggers. I can really recommend it, as it is a comprehensive template and is GDPR compliant if you want to.
I know that the cost is always the pain for us students, but getting sued would end in muuuuch higher costs.
It is up to you which way you choose, but I couldn’t just leave out this important information, because you do need legal pages.
10. NOW YOU ARE READY TO LAUNCH!
Now you know how to start a profitable blog, including your blog name and mission statement, how to sign up to Bluehost for less than $4($3!) a month.
You know where to purchase affordable themes and where to learn more about Pinterest. Which email provider to use, and where to get legal page templates!
These were just my basic steps on how to start a profitable blog as a student. You will learn other things that go with blogging on your journey to the top!
Are you interested in not only how to start a profitable blog, but also how to MAKE MONEY blogging? Then I recommend you to check out my FREE blogging email course! Since this post about how to start a profitable blog got too long already, haha.
If you have any questions, please leave a comment or contact me privately through the contact form or my social media.
I hope you enjoyed this guide on how to start a profitable blog! I can’t wait to see you succeed!
Make sure to check out my post about 15+ ways to make money as a student!
Until soon,

Here is my video about how to start a profitable blog! Check it out here:
By loading the video, you agree to YouTube’s privacy policy.
Learn more


WordPress seems to be a great platform to start a blog specially for newbie. I think for me if you need a blog for a budget this post suits all newbies.
I am sure this post has touched all the internet visitors, its
really really nice post on building up new weblog.
I’ve been browsing online more than three hours today,
yet I never found any interesting article like yours. It’s pretty worth enough for me.
Personally, if all webmasters and bloggers made good content
as you did, the internet will be a lot more useful than ever before.
Hi there! This blog post could not be written any better!
Looking at this article reminds me of my previous roommate!
He always kept preaching about this. I will send this post to him.
Fairly certain he’s going to have a great
read. I appreciate you for sharing! http://alienware.com/
Hey There. I discovered your blog. That is an extremely well written article.
I’ll be sure to bookmark it and return to learn more of
your useful information. Thank you for the
post.
Incredible points. Solid arguments. Keep up the amazing work.
I’m really enjoying the design and layout of your blog.
It’s a very easy on the eyes which makes it much more pleasant for
me to come here and visit more often. Did you hire out a developer to create your theme?
Exceptional work!
thank you! I actually bought this theme for $35 at CreativeMarket and changed a few things in CSS.
Admiring the persistence you put into your blog and in depth information you present.
It’s awesome to come across a blog every once in a while that isn’t the same out of date rehashed information. Fantastic read!
I’ve saved your site and I’m adding your RSS feeds to my Google account.
that means so much, thank you!
Hey I know this is off topic but I was wondering if you knew of any widgets I
could add to my blog that automatically tweet my
newest twitter updates. I’ve been looking for a plug-in like this for quite some time and was hoping maybe you
would have some experience with something like this.
Please let me know if you run into anything. I truly enjoy reading your blog and I look forward to your new
updates.
I don’t use Twitter as much, but there is a blog post (https://www.socialmediaexaminer.com/how-to-automate-your-tweets-3-useful-twitter-apps/) about good plug-ins for that!
WordPress is the most popular CMS in the world with market share of 60%.
Fact:- 40% of all website in the world uses wordpress.